
Talon One: The Stealth Raptor
My name is Kyle Beavers and I currently work as a graphic designer in the greater Seattle area in Washington state, USA. I have a Bachelor’s degree in fine art and illustration and have continued my education by becoming certified in modeling characters for games. I have been trying to break into the gaming industry and ultimately land a job at a gaming studio as a character artist.
For Art War 5, I created Talon One: The Stealth Raptor to represent The United States of America. I got the idea for the name Talon One from Air Force One, the airplane for the president of the United States, and stealth raptor is derived from the eagle, a perfect mascot for America.
Concept
First, I started by creating a board of reference images. I gathered images that I felt would not only get the creative juices flowing but also give me direction in the shape, form, color, and material(s) of this character. I used a program called Pureref and it is amazing for reference images, I highly recommend using reference images throughout the whole process of character creation.

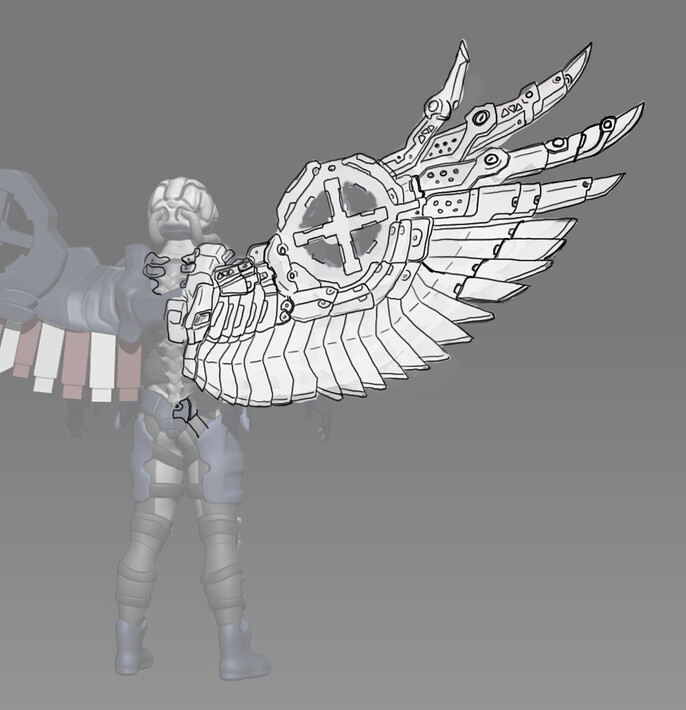
Then I started sketching a rough concept. I did a couple of rough silhouettes. I knew I was going to go with a helmet on this character so I made a sketch of the helmet as well. I wanted his helmet to resemble a bald eagle head, with the air intake vents on top resembling the eagle’s eyes and the numerous helmet panels resembling the head’s feathers.
From there I was able to flesh out the concept more and more until I had something that I was happy with to work off of. It’s not a perfect sketch, but it gave me enough for a good starting point.


High Poly
Next, I moved into Zbrush where I blocked in the character’s basic anatomy, shape, and worked on proportions. Once I had those correct, I was able to start sculpting a high poly model. It’s always best to start with simple shapes and work your way down to smaller details.
I modeled his skinsuit then his helmet and wings, adding rough placeholders for each component. After blocking in the concept, I realized I wanted his wings to be more mechanical, so I took a screengrab and threw it into photoshop where I created a paint-over. This allowed me to really flesh out the finer details of how his wings worked and functioned on a more realistic level. From there I could fine-tune the details on the high poly model. It was at this point I had the idea to do fifty feathers, twenty-five on each wing, to represent the fifty states of the United States.
I did the same for the helmet and the rest of the armor, starting with a rough basic shape and fine-tuning details more and more.

For most of the hard surface modeling, I started with a rough block out in Zbrush, which I then would fine-tune, either with brushes and polish in Zbrush, or a quick retopology and cleanup in Maya.

Low Poly
Once the high poly model was finished, it was time for retopology, so I imported my model into Maya. I knew that this character was going to be moving since I would be posing him later on, so I wanted to make sure that his armor was retopologized separately from the base body. His body would also have to bend and be movable so I designed his armor pieces in such a way so as not to have object crashing. For the helmet, to save on my budget, I retopologized it all as one piece instead of individual panels.

UVs
I created my UVs in Maya as well, packing and optimizing for maximum texel density. There are three sets for this character: the helmet, the wings, and the body.

Texturing

Finally, it was time to bake and texture. I have baked maps in Substance Painter in the past, but the organization of Marmoset Toolbag is so much nicer in my opinion for baking. So for this character, I did all my map baking in Marmoset Toolbag.
I used photoshop to clean up any and all baking errors and random artifacts.
From there I textured in Substance Painter.

Rigging and Posing
Next, I sent the model back to Maya for rigging. I am not the best at creating rigs, but I created a rough skeleton that would work fine for posing. I tried a couple of different poses, trying to keep in mind what each pose would convey and what the story was behind the action shot.

Rendering

Finally, I set everything up in Marmoset Toolbag. I modeled and textured background features, such as the American Flag pole and 3d fireworks for depth.
I placed the model in my scene and chose a sunset HDRI for the darker shadows. Then I set up colored lights in the fireworks to emit red, white, and blue lights onto the model. I placed a few child lights in front of the model as well. Then I toggled the camera settings until I found the depth and focus that I was happy with. I played with a few different camera angles but finally found one that I liked.
And that is how I made Talon One: The Stealth Raptor.

See more of Kyle's work or contact him here: