
Digital Art Mini-Tutorial: Uneasy Bedfellows
Justine Hamer takes us through the process of creating 'Uneasy Bedfellows' in this great mini-tutorial.
Hamer is a environment artist at Imangi Studios who has a special interest in environment design which lead her to participate the Cubebrush Worlds Challenge.
Hi! My name is Justine Hamer, and this is the process for my Cubebrush entry Uneasy Bedfellows. If I had to say this process had a theme, it would be 'The Power of the Paintover.' From the beginning I knew I wanted to make an illustrative stylized environments, and so constantly appreciating it as a 2D piece was important for maximum appeal.
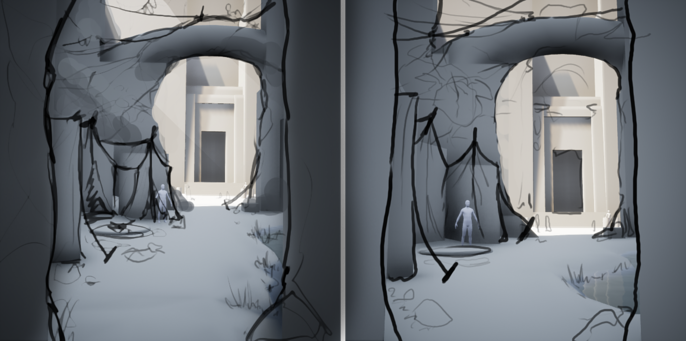
The first inkling I had for this piece was simply: a cave, tents, a temple, a massive arch separating the foreground and the background. I could have spent more time during the concepting phase painting, but I really wanted to get into the engine and block things out and so I gave into my intuition, throwing in basic shapes to capture the key aspects. I originally used UE4's landscape tool for this, but found that hand-made primitives were much more efficient to get silhouettes in. I gave this a quick sketch-over to make sure I liked it, and then I began to break it out into specific assets.
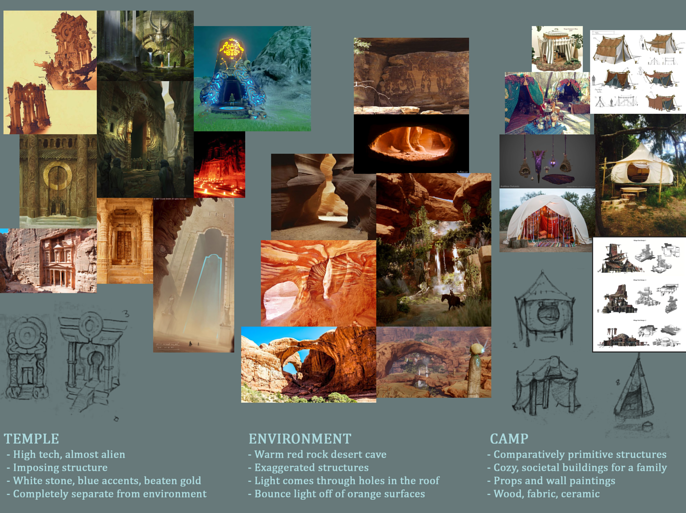
I used Pinterest heavily during the first phases of a project for reference and inspiration. I would load up screen full of images I'd gathered and sketch out designs in my sketchbook until I find something I like.
Then begins the modelling stage, which is comparatively simple. If you're familiar with the Maya to zBrush process, it's nothing special: I blocked things out in Maya, sculpted details in zBrush, and baked things down onto a lowpoly model using Marmoset Toolbag. This can sometimes require multiple passes to make sure the lowpoly has enough polys to fully express the intended silhouette-- I had to go back a few times on the rocks especially to make sure they were appealing enough, as they're the main framing aspect in this piece.
The texturing process is a bit involved: I wanted simplicity, with bold strokes and very subtle texturing detail. I baked a normal, a cavity map, and an ambient occlusion map using Marmoset. I used a gradient map to colourize the green channel of the normal map-- gradient maps are my best friend, as they let me be very specific with the colours in the highlights and shadows. I can't afford to have desaturated shadows if I want to achieve an appealing stylized colour palette. I also layered the cavity map, one regular and a bunch that have been blurred a lot to make the highlights softer and less specific.

Once I had everything in-engine, I started to get into the lighting and post-process. I had the privilege of having my good friend, the incredible Mike Marra, do a quick paint-over to add more drama and interest to my lighting set-up. Never underestimate the lighting phase: it can make or break a piece, and serves to highlight everything you want the viewer to see. Lighting guides the eye through the piece.

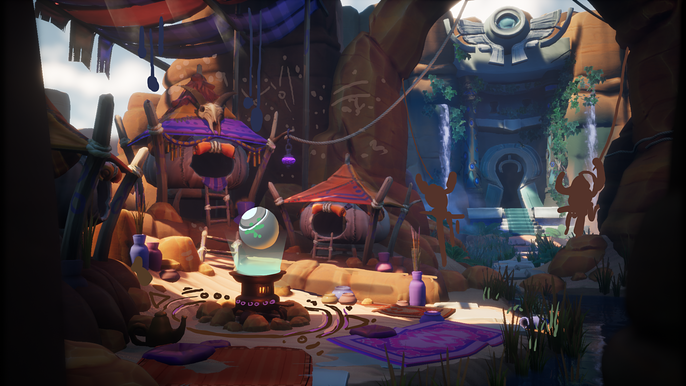
So I'd gone through the steps to make a piece: concept, modelling, sculpting, texturing, lighting, post-process. So was I done? Absolutely not. I needed to do a detail and refinement pass, and to do that another paint-over is necessary. Details really sell the story of the piece and brings the civilization alive. So I went back, modeled more bits, added more detail, and brought the whole thing together. This is when I add narrative pieces, solidify the story, and set up cameras for the fly-through.
So that's basically my process: iterate, iterate, iterate, and go with what feels right. Don't be afraid to step back and take a break, and come back with a different viewpoint. Thanks so much to Cubebrush for this opportunity, and good luck to the other finalists!
- Justine W Hamer
Justine's portfolio can be found here.
@yungst3n on Twitter